How do you set up the Joby Smart Stabilizer Gimbal and App?

How to use the Joby Smart Stabilizer App

The Joby Smart Stabilizer is an easy to use and feature rich phone gimbal. The online instructions for the App are virtually non-existant so i've written this post to help you setup your phone for videoing on the gimbal, understand the buttons, controls and app features so you can try out a few creative videos.  

One of the main advantages of the Joby Smart Stabilizer is that it is compatible with a lot phones, even those that aren't top of the range, such at the iPhone Pro or Samsung Galaxy S20 range which need a DJI Osmo Gimbal. With the Joby i was pleasantly surprised how easy it was to use and how well it worked. It's not perfect but neither is the DJI Osmo, but knowing their limitations help.For this app review i've use a Samsung A32 5G and it's in 9:16, ready for Instagram and other social media videos. The app gave me more features than i had on the phone such as WB, shutter speed, ISO, face and object tracking and dolly zoom!

Setting up the Gimbal
The phone needs to be balanced first before you turn on the gimbal. Screw-in the foot to the bottom of the gimbal and place on a flat table, as this helps to balance the phone.


Unlock the horizontal cross arm from the vertical arm at the rear of the gimbal. You can see the lock symbols inside the yellow circles on the images.
  It may feel stiff to unlock at first, hold the arm and turn towards the unlock symbol.


To insert the phone into the holder, pull out the clamp on the left side and let go once the phone is in place. If you are filming vertically (9:16) then you will need to turn the phone clamp 90˚ to the left (anti clockwise) before inserting the phone.


The lenses should be at the top and you will need to slide the phone up so that the side buttons are visible and not in the clamp, otherwise this could turn the phone off or make the phone act in an unpredictable way.


Slide the cross arm until the phone balances horizontally.  For the Samsung A32 5G phone it’s about 1 notch or 0.  The phone should look level and now with careful positioning you should now be able to balance the phone so it stays in place vertically.   Don’t worry if it tilts forward slightly.


Now turn on the gimbal by holding down the red power button.  The gimbal will make a noise and shake a little bit as it tries to balance the phone.  
If it spins or shakes too much then turn it off!  Sometimes it can help just to very gently hold the phone while you turn it on.


Now turn on the Smart Stabilizer App, it should connect automatically via Bluetooth.  If it doesn’t you may need to turn on the bluetooth on your phone.   After that restart the app and if it still fails to connect turn off the stabilizer and start again.


Attaching a Microphone

If you want to attach a small microphone such as the Røde VideoMic Me to your phone to improve the sound you will need to remove the hard rubber grip as this gets in the way of phone functions and also the fluffy cover if you have one.  This can cause some stability issues with the gimbal so best for still interviews as there is limited movement vertically and up and down.

It’s best to attach the microphone to the phone before turning the stabilizer on.  To balance with this small microphone attached adjust the cross arm to the 5th notch.  Again gently hold the phone and turn on the gimbal and start up the Smart Stabilizer App.

A long cable attached to lavalier (Lav) mic should be fine, but be careful the cable isn’t pulled tight when filming as this will cause problems for the stabiliser and could damaged the motors.


Straightening the Phone
.
If the phone isn’t vertically straight you can straighten it by adjusting the joystick control on the front of the gimbal.  Use your thumb to move it up or down so that it’s vertical.

If the phone doesn’t look level horizontally, you will need to use the app to correct this.  The phone may only tilt down slightly on one side, but if it does then this will make your recorded image look uneven.


Press the Advanced Settings icon it looks like a cog or a flower, this is located at the top of the phone on the right, inside the yellow circle to the right.  In there you will find several options to adjust your gimbal but look for Horizontal Calibration, it’s the second from the bottom.

You have three levels of adjustment available from small increments  to much larger movements, 0.01˚, 0.1˚ and 1˚. If it’s only a little uneven select 0.1˚ and if it’s noticeably uneven then select 1˚.  Once selected look for the ø icons under Adjust.

To tilt to the phone’s the left corner up press the left icon and to tilt the right corner up to level the phone use the right icon.  To return to the settings or main screen press the arrow at the top on the left.


Recording, Controls and Gimbal Buttons
These are the main buttons and controls on the gimbal, this where you are able to select different modes, take photos, record video, zoom in or out and reset the gimbal.

The buttons on the front are Record Button, Joystick Controller and the Function/Power button, usually controlled with your thumb.  At the back of the gimbal is the Trigger Button controlled by your index finger and on the side in green is the Control Slider with a T and W either side.


Recording Video  
To start video recording press the red Record button on the front of the gimbal once, above are the Photo and Video icons.  This will start the timer with the numbers in red, showing the microphone with levels, plus your FPS and Video resolution.  You can see an example of the icons on the image to the right.  To stop video recording press the red button once and it will save the video in your phones main photo library.

Joystick
Using your thumb you can control the up and down axis, roll and panning of the gimbal.  If you feel it reacts in the opposite way to how you  expect you can change this in the Advanced Setting menu section.  Click on the Cog and then Joystick Settings.

You have a variety of options in here where you can reverse both panning and tilting  control.  Try them both as normal and then both reversed and use which feels natural to you.  Sometimes you want to pan the gimbal upwards and it goes down, if this is the case just reverse the control.  Personally I prefer them both reversed.

You are able to change the speed of the tilt or pan, in the middle is typical but this is entirely up to you how fast you want this to happen.  Try it as the slowest, then in the middle and finally fastest.    The speed you choose depends on shot, for example a slo-mo video filmed at 120 FPS may suit a faster pan or tilt.  A fast pan is better for a speed ramped video where you need to get from point A to B quickly.  Slower pans and tilts can look more stable but tend work where there is a lot more going on in frame or where you need the viewer to see each frame.

In the end it’s your choice and how you feel the motion works, so experiment with each setting until you find the speeds that work for you.


Function button

This is the on and off button and it performs a few gimbal functions without you needing to go into the menu or touch the screen.


Click  :  Pan Mode/Lock Mode   Switches between pan and lock mode
Clicks:  Follow mode  - Joystick left/right control roll axis
Clicks:  Switching camera lens  -  It needs to be used with the App
4 Clicks:  Motion control mode - Rotate both the pan and tilt directions
5 Clicks:  Reset gimbal - Click the function button to restart


If the stabilizer fails to connect to the App, power off the stabilizer.  Press and hold both the Bluetooth shutter release button and the function button to reset the Bluetooth connection.  Also close App and reopen with Auto Connect selected.

Trigger Button
To lock the gimbal in position whilst filming pressing down and keep holding the Trigger Button.  This is really useful when you need to move towards or away from something, or panning across a scene as the gimbal locks in to position for a smoother move.  You must keep your finger held down on the Trigger whilst filming.

Press & Hold:  Temporary Lock  -  Locks pan and tilt until released.

Double click: Reset to default  -  Centres on all axes, switches back to pan mode.

 
Follow modes
Select the Advanced Settings and Follow Mode.  The default mode is Pan Follow and it’s best to leave in this mode for most filming settings.  If you are following someone moving then Pan & Tilt Follow is best.  You are also able to change these modes using the Function and Trigger buttons.

Lock: holds the phone in place
Pan Follow:           follows hand movement for panning
Pan & Tilt Follow:  
follows hand movement for panning and tilting
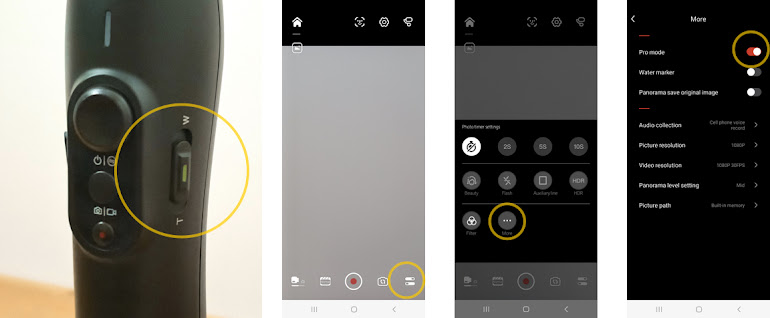
Control Slider

On the right side of the gimbal with a green mark is the Control Slider either side there is a T and W, which enables you to zoom in and out of the scene without touching the phone.  


It can also control other functions in Pro Mode such White Balance, Shutter Speed, Exposure, ISO and  MF (manual focus).  If these functions don’t appear when you slide the bar then you can turn them on  via Pro Mode manually via the Settings Slider at the bottom right on the screen.  Then click on the More icon and slide Pro Mode button so that it’s red.

The most useful settings are W/T the zoom control, EV exposure control and AWB white balance control. 


To adjust any of the modes either click on the icon you want to use and move the slider with your finger or once the icon is selected adjust with the Control Slider on the gimbal.

W/T     adjusting the zoom from 0.1 to 4

    (unless your phone has a larger zoom)


EV     start at 0.0, -1.0, -2.0 will be darker

    and 1.0, 2.0 will make the image brighter


AWB
Auto is for most outdoor situations, may be inconsistent.
INCA indoor lighting, scene looks orange (adds blue)
FLUO indoor office lights, scene looks green/yellow (adds magenta)
WARM indoor lighting, scene looks orange (adds blue)
DAY         outdoor daylight/sunny, scene looks normal (neutral)
CLOUD outdoor cloudy, scene looks bluer (adds a little orange)
TWI         outdoor twilight, orange street lights (adds a little blue)
SHADE outdoor in the shade scene looks blue (adds orange)


Each WB will change the colour of your image slightly, although the settings are fairly self explanatory they essentially make the image either warmer, cooler or with fluorescent tubes less greeny/yellow.  


If you are unsure just select a setting until the image looks neutral.  You can of course use CLOUD or SHADE to warm up the image for sunsets and for night skies add any of the blue filters, INCA, WARM or TWI for bluer night skies.

Smart Stabilizer App Adjustments and Settings 

Face Recognition and Tracking.

On the home page you will see a face icon at the top of the screen.  If you select this the phone will look for face and lock on focus which is really useful when filming interviews.  When selected the icon will turn red to show it’s face tracking.  

You will see a menu screen appear when faces are automatically tracked a green box will appear when recording.  If you want to track an object draw around the object you want to and when you let go a blue frame will appear showing the object to be tracked.   You need to click the Function button twice so the gimbal is in follow mode.  One issue when object tracking is that the face or object are placed in the centre of the frame leaving a lot of head space above.  It is pretty good at following someone moving around but it can lose them if they move too quick. Try it out and if the gimbal tracks for you then it’s useful 

If you don’t wan’t the menu box to appear again you can select Don’t show up next time and press okay.  To deselect any tracking, face or object just press the face icon again.


Shooting Modes

There are five modes, the four useful modes for filming are Normal Video, SloMo, Dolly Zoom and TimeLapse.


Normal:         Main video setting
SloMo:           Slow Motion video also useful for Speed Ramping
Dolly Zoom:  Will automatically zoom in or out of a scene
Timelapse:  Records a speed up film, all day into 10 seconds.


Select the Normal icon next to the Record icon and the choices will become available.

Normal
This is the standard video mode for filming and ideally it’s best to set this to the highest video quality available as you can always reduce file size afterwards, it much more difficult to increase resolution in post and it doesn’t always look that great. 

This does depend on your phone as not all phones can record UHD (8k or 4k) at all frame rates and some only film in HD.   To find the phones maximum resolution either look in your phones settings or the Joby Smart Stabiliser App settings. The resolution for UHD 4k is 3840 x 2160 and HD is 1920 x 1080 or 1280 x 720.  If your intention is to show the video on Instagram, Facebook, Twitter or TikTok then HD is suitable.

The typical frame rate for the UK is 25 FPS (frames per second) but most phones record video at 30 FPS either is fine although the standard frame rate on social media is 30 FPS.


SloMo

In slow-motion mode you are setting your phone to record more frames per second than it typically would, when played back at normal speeds it slows down the video.  If normal playback speed is 30FPS then recording at 60FPS the video will playback at half-speed and recording at 120FPS will playback at a quarter of the speed.  This is why the video looks like slow motion. This does depend on your phones capabilities, again check in the settings to see the maximum FPS.

With slo-mo footage you are able to either play it back so the movement is slow or change playback speed so the video changes from slow movement to a normal or fast movement, this is Video Ramping.  When using 60FPS video footage you can double the speed in post by 2x to look like normal motion and with 120FPS video you can speed the footage up by 4x times to show normal motion.

With both SloMo and Normal footage you can of course speed them up by any amount but the video can look comical.   If you want fast moving images you may be better off using Timelapse.


Dolly Zoom

This function is a good way of zooming in to and out of a scene without having to touch the phone and making a wobbly video.  

Select Video then Dolly Zoom, this will take you to the menu where you select how how long you need the zoom to take, 1, 2, 3… up to 20 seconds under Scale Time.

Also you can be creative and zoom the opposite way to which you moving.   If you are walking towards a certain point then try zooming out whilst moving closer and when you walk away zoom in to, this creates a ‘Hitchcock’ Vertigo effect where the main object of the frame appears to remain the same size whilst the background changes.

Expand zooms into the picture and Shrink zooms out of the picture.  Leave it on 2 times at the bottom and ignore 3 or 4 times.


A Dolly Zoom that starts wide and zooms in, 2-5 seconds is about typical but this does depend how long you need the shot to be, so select the required length for that scene.

The images below use Expand and set for a 4 second.   With the Samsung A32 5G the opening frame starts wide with a 1x zoom and then it takes 4 seconds to dolly into a 4x zoom on the final frame.  Depending on your phone and it’s lenses you may find the zoom range is different.


TimeLapse
When you need to record a long period of time and show it as a short video choose Timelapse from the video mode.  You can record a whole day and show it as a 30 second video, or just an hour and see it as a 10 second video.

This effect can look nice recording a sunny day from sunrise to sunset, so that when you play it back the shadows appear to move across the scene and light changes from sunrise orange to  daylight and back to sunset orange.

Before you create your Timelapse video think about how long you need it to be 5, 10, 15 or may be 30 seconds.  Also do you need to record an event for an hour or for 5 hours?

First set the Record Time, mine is for 5 hours and then change the Interval to 60 seconds, you can see the Play Time, which is beneath Record Time  shows that the final video will be 10 seconds long.  This means it will record one frame every 60 seconds for 5 hours and automatically create a 10 second video for you.   When filming over a longer period of time you may need to attach an external battery charger or power pack to your phone to prevent the phone from loosing charge and turning off.


Charging the Phone from the Gimbal

There are two ports on the gimbal one to charge the gimbal and the other will power the phone from the gimbal.  This is useful for time-lapse photography and videos as your phone battery may run out of power first.   There are 3 shorter cables with phone connectors supplied in the case, a Micro to Micro cable, Micro to Lightning cable and a Micro to Type C cable.

If you look on the cross arm behind phone clamp you will see a rubber cover with USB on, put the cable in here and the phone connection in your phone before turning the gimbal on.


Limitations When Using the Gimbal
There is a limit to how far you can tilt the gimbal down physically, too far and it will start to shake or try to rebalance.   If you tilt phone down via the joystick you may find the gimbal come into shot, especially with a wide angle lens.   This is more of a problem in a vertical shooting mode.  Setting the lens or 1x or more will elevate this problem to some degree.

Practise waling around with the gimbal to test it’s limitations.  How to move with it forwards, sideways and up and down.  You can tilt the gimbal up to film rising shots or smooth pans and walk throughs.  When turning a corner, be patient as it can feel like it takes the gimbal a little time to catch up, but it does follow to motion.

Gimbal Status Indicators

Blue light flashes once: Pan mode

Blue light flashes twice:  Follow mode
Constant blue light:
Lock mode, stabilizer initialisation & motion control

Blue light keeps flashing: Initialisation failure or malfunction

Red light flashes three times:  Low power
Red light keeps flashing: Stabilizer powering off


Photography & Video Training with MelenTraining
melentraining.co.uk/

Post a Comment

0 Comments